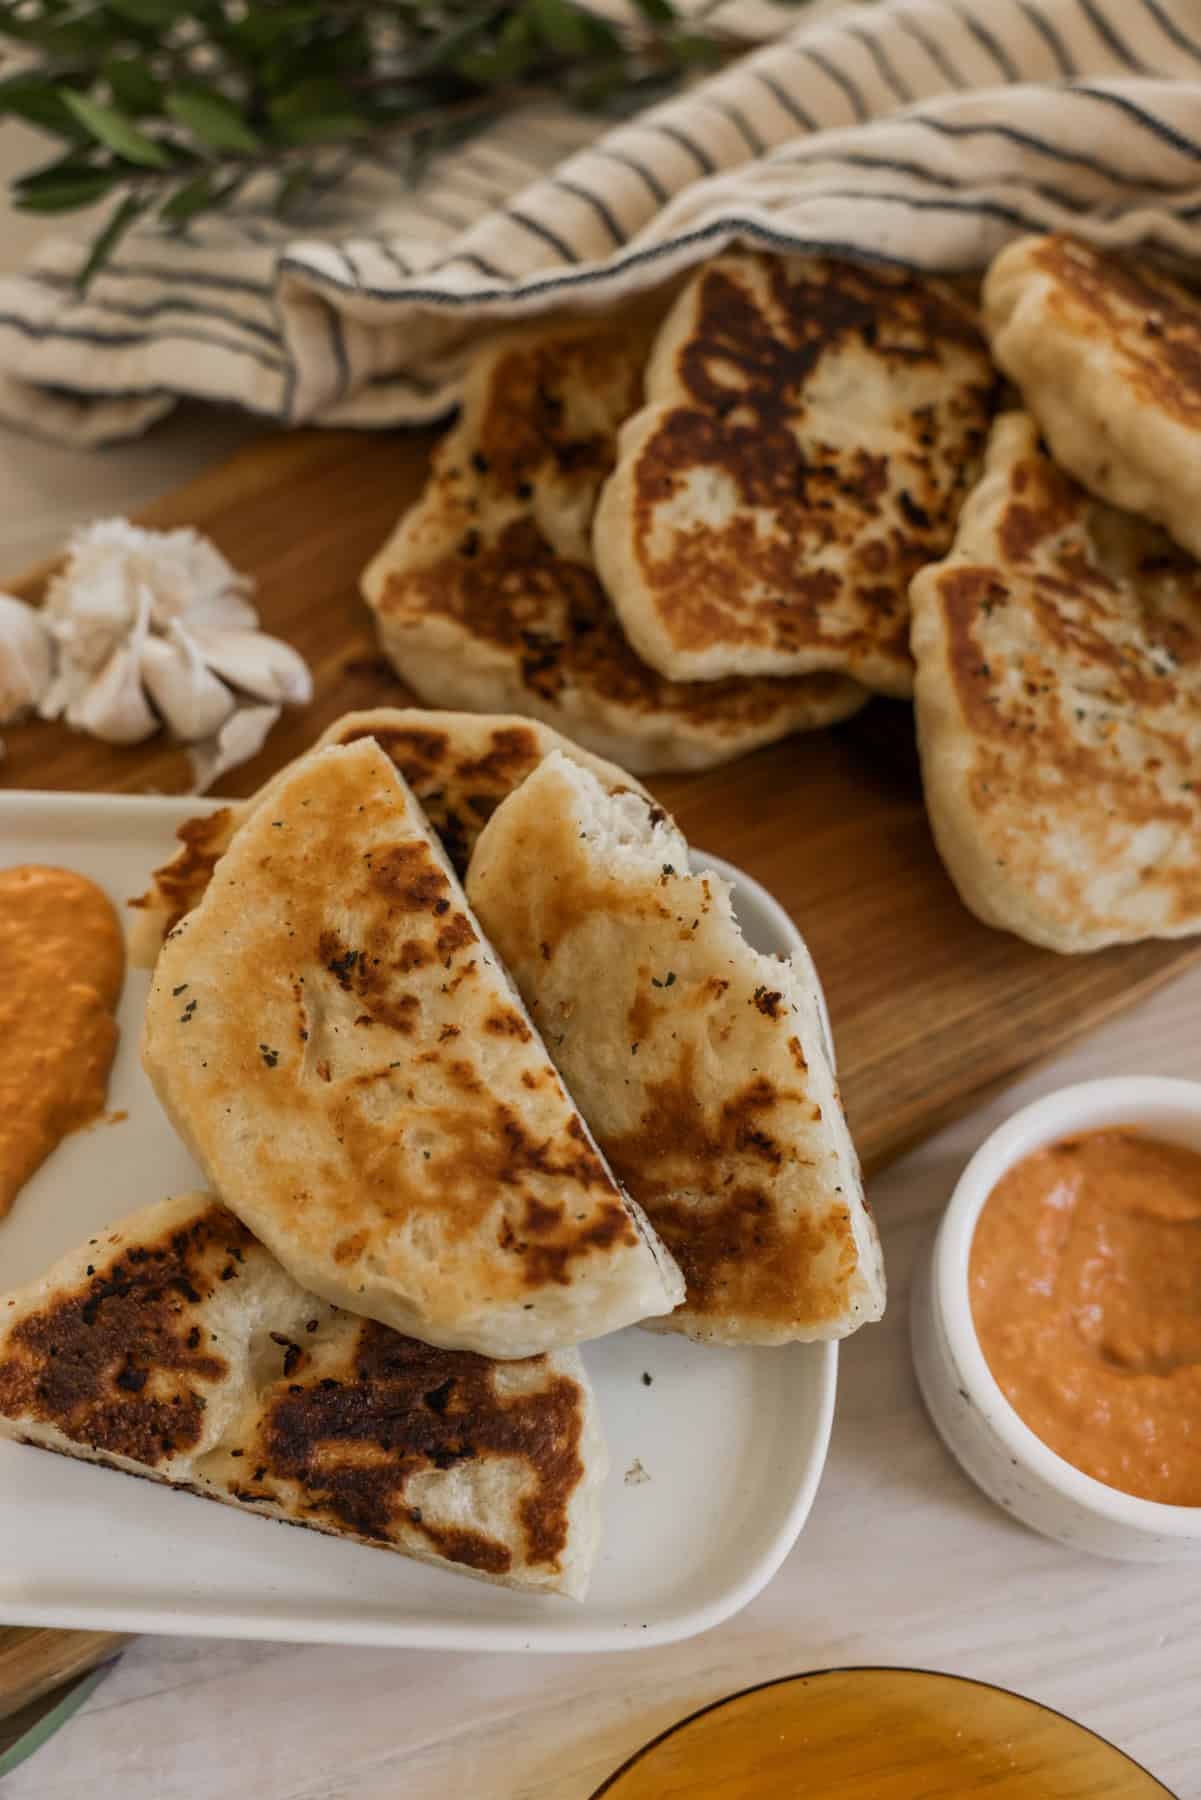
Pita is one of my favourite breads. It is fun to dip, stuff or eat alone! This chewy sourdough pita recipe has the perfect amount of tang and tender texture with all the while being amazing for your gut.

If you are looking for a gut friendly alternative to store bought pita, this will serve you more than well. It is made the day before you are going to enjoy it and we use bubbly active sourdough starter to help ferment the grains and starches, benefiting your body in many ways!
Using an active starter will help with flavour development (give your pita some amazing tanginess!) and also give a helping hand at forming bubbles and air in the dough itself. Anytime I make chewy sourdough pita for the family, it is gone within the meal time it is being served at. It is also a well known recipe of mine that gets handed out frequently because it is hard to live without a good pita.
Why Sourdough?
I was gluten free for years after experiencing migraines and headaches anytime I touched gluten. A friend told me that they found they were able to enjoy ALL glutenous goodness as long as it was made with a fermented sourdough starter. This intrigued me because GF bread was just not doing it for me.
Within 24 hours, I got myself a sourdough starter and began to figure this out. Within a week of eating sourdough fermented breads, I boasted of zero migraines/headaches AND even saw my skin clearing up.
Fast forward to now, I bake all our own bread by use of an active sourdough starter or with the discard. Either way, my body (and my family’s body!) loves it!
Here are some sourdough facts for you:
- Sourdough is easy to digest: It contains a natural bacteria and germ in the fermentation process that will break down the starches in the grains before they even hit your stomach. Basically, very gentle on your gut!
- Blood sugar friendly: With sourdough being fermented, it works against any bad starches and ingredients that can cause your blood sugar levels to rise and spike.
- Full of good acid: The acid in sourdough breads can help your body process foods easier and absorb more minerals, yielding a stronger immune system and better health overall.
- Good for GF sensitivities: In the creation of sourdough bread, gluten is broken down overtime and has changed into amino acids before you enjoy it. This aids in easier digestion and gut health.
- Less preservatives: Sourdough preserves itself naturally using acetic acid, nothing fake here!
- The flavour: Sourdough has a tang and flavour like no other bread. It is hearty, satisfying and extremely delicious.

Chewy Sourdough Pita Ingredients
- Active Sourdough Starter: This will ferment the dough for gut health benefits, create a tenderness through the dough, build air and bubbles inside the pita and give it an amazing flavour.
- Milk: If you are not dairy free, use a regular cow milk. I can’t eat milk nor do I like the taste of it so I use an unsweetened almond milk here.
- Water: Use filtered water to get the best results! Water with heavy amounts of bleaches and chlorines can prohibit the fermentation process.
- Olive Oil: I love using a dark olive oil for this due to its robust taste, but use whatever you have!
- Flour: The flour I use is an all purpose organic flour sourced from my local mill but any all purpose flour will do! Use bread flour for a lighter texture.
- Sugar: This will help soften the grains which can form a tight structure during the fermentation process. I use organic cane sugar.
- Salt: As usual, I always reach for sea salt. The flavour and health benefits are wonderful!
- Extras: Olive oil, dry parsley, fresh minced garlic, etc are a great additive to these if you have some extra time! I warm the oil, add in the garlic and parsley and brush it onto my pita during or after the cooking process. It smells 10/10 too!
To make and store this recipe, I use these tools. Click the text to shop:
*Some links are affiliate*
If you are wanting a thicker pita, just be sure to put less pressure on the rolling pin to help create depth and cook on a lower heat setting to ensure that the inside gets heated evenly. If a thinner pita is what you want, roll your dough thinner and cook on a medium heat, flipping quite quickly after laying it on your pan to prevent hardening or crusting of the pita.
How To Make Chewy Sourdough Pita From Scratch
Because we are using sourdough and are fermenting these, we will need to prepare them the day before you plan on enjoying them. For example, if you want to eat these on a Tuesday, you need to prepare the dough Monday evening.
The dough can be mixed by either a bread machine (my favorite way!) or with a stand mixer using a dough hook attachment. My bread machine is amazing because it kneads and rises my dough overnight while I sleep!
Needing a hummus to pair? Try my Roasted Red Pepper Peanut Butter Hummus recipe!


Baker’s Timeline:
This can be started or made at any time. I like to start doughs at night time so they can rise all night. In the afternoon, they are ready to shape and cook. The time slots are to be looked at as starting that step in between those times. You can easily stretch these times in the day to make it work best for the meal you are preparing it for.
STEP 1: MAKE THE DOUGH
Combine your wet and dry ingredients using either a bread machine or a stand mixer and let the dough sit covered in a warm place overnight. The dough while develop in flavour and texture during this time.
STEP 2: DIVIDE THE DOUGH
Remove your dough from the bowl onto a non floured surface and divide into 10-12 equal sized pieces.
STEP 3: COOK
Grab your skillet or cast iron pan and begin heating on a medium heat. I like brush my pan with a bit of olive oil and minced garlic with parsley. Take a piece of dough, flatten it with either your hands or a rolling pin until your desired thickness. Cook until the pieces are browned and puffy. If medium heat is too much, feel free to lower the temperature.
STEP 4: EAT EAT EAT
Enjoy these right away (they taste best hot/warm!).
Stay In The Loop!
Sign up and get my posts sent right to your inbox!
How To Store
Keep your pita in the fridge for 7 days in an airtight container or bag. To refresh and eat them again, simply reheat in your microwave, oven or on a pan!
If you enjoyed this recipe, be sure to share and tag me @sarahthereseco on Instagram and come back here to rate and leave a comment!
Chewy Sourdough Pita
Equipment
- 1 bread machine
Ingredients
- 155 Grams Bubbly sourdough starter
- ¾ Cup Almond milk or dairy
- ⅓ Cup Warm water
- 2 Tablespoons Olive oil
- 2¾ Cups Flour
- 2 Tablespoons Sugar
- 1½ Teaspoons Sea salt
Optional
- Olive oil
- Dried parsley
- Fresh minced garlic
Instructions
- In the order listed above, combine everything in your stand mixer with the dough hook attachment or in your bread machine on a basic dough setting. I always use my bread machine because it lets my dough rise as part of its normal dough cycle. If you are using a bread machine, you can turn it on and leave the dough here overnight. If you are using your stand mixer, once the dough is well turned and elastic with some good tension, cover it with a damp cloth and leave on your counter overnight. The dough will be stickier than your usual bread dough, but if you would like it easier to work with, add in a few tablespoons of flour.
- When you are ready to cook the dough, ready a pan or skillet. I prefer cast iron for this but any pan will essentially work. Put it on a medium heat for cooking. We don’t want it too hot that it cooks the outside before the inside is properly cooked thru! Take the dough and divide it into about 10-12 equal sized pieces. This is optional, but I like creating a special spread made with a few tablespoons of olive oil, some parsley and a handful of minced garlic well mixed. I use this to grease my pan and brush it over my pita as well during the cooking process. Take a piece of dough, flatten it into shape using firm pressure with your hands, and place onto the pan. I do not flour my work surface but instead press each piece down with my hands on a clean surface or lightly oiled surface, if I find it is getting too sticky.
- Cook the pieces until puffy and well browned on both sides. And again, brush the sides of the pita with the olive oil mixture for extra garlic flavour.
- Eat immediately or keep in the fridge for a week! They reheat beautifully!
Right now trying to get my sourdoughstarter to come alive (day 3). Can’t wait to make these flatbreads. I’m quite an unexperienced baker… do you think I can replace (part of) the flour with wholewheat flour?
Hi Marlies! Go starter go! You can replace up to half the white flour with whole wheat. You may have to add in extra water to help the dough come together well since the whole wheat can dry out your bread 🙂
Do these have a pocket? They look great 🙂
They do not! They are a very full bread throughout. I do have a sourdough puffy pita recipe that I am working on because I love a pocket!
How long can these be left out for on the counter? If I start the night before will they be ok for dinner the following night? Thanks so much!
Hey Kate! This depend on the temperature in your home! During the winter months, I can easily keep this out on the counter for 24 hours. Nearer summer, I may let this rest overnight at room temp and then place in the fridge until ready to use to prevent over fermentation. Sometimes on a very warm day, I will make the dough early in the morning and make for dinner!