When I first started sourdough, it was a wild ride. As someone who previously made bread, this was a completely different technique that what I was accustomed to. After I failed so many traditional, heavy hydration sourdough round loaves, I decided to create a beginner, fool-proof sourdough artisan round loaf for the person who is just starting their sourdough journey. And don’t worry, no flavour is sacrificed here. It is still delish!
A round loaf is a traditional sourdough bread that many people know of by now. It is fermented and naturally leavened using a sourdough starter, giving it gut healthy benefits and a beautiful texture.
Using an active starter will also help with flavour development (giving your bread some amazing tang and a robust taste!) and also give a helping hand at forming bubbles and air in the dough itself. In order for me to make this loaf from home, it costs me less than $2.00. Yes, I am serious.
Why Sourdough?
I was gluten free for years after experiencing migraines and headaches anytime I touched gluten. A friend told me that they found they were able to enjoy ALL glutenous goodness as long as it was made with a fermented sourdough starter. This intrigued me because GF bread was just not doing it for me.
Within 24 hours, I got myself a sourdough starter and began to figure this out. Within a week of eating sourdough fermented breads, I boasted of zero migraines/headaches AND even saw my skin clearing up.
Fast forward to now, I bake all our own bread by use of an active sourdough starter or with the discard. Either way, my body (and my family’s body!) loves it!
Here are some sourdough facts for you:
- Sourdough is easy to digest: It contains a natural bacteria and germ in the fermentation process that will break down the starches in the grains before they even hit your stomach. Basically, very gentle on your gut!
- Blood sugar friendly: With sourdough being fermented, it works against any bad starches and ingredients that can cause your blood sugar levels to rise and spike.
- Full of good acid: The acid in sourdough breads can help your body process foods easier and absorb more minerals, yielding a stronger immune system and better health overall.
- Good for GF sensitivities: In the creation of sourdough bread, gluten is broken down overtime and has changed into amino acids before you enjoy it. This aids in easier digestion and gut health.
- Less preservatives: Sourdough preserves itself naturally using acetic acid, nothing fake here!
- The flavour: Sourdough has a tang and flavour like no other bread. It is hearty, satisfying and extremely delicious.
Beginner Sourdough Artisan Round Loaf Ingredients
- Active Sourdough Starter: This is what will work to ferment our dough, create an amazing flavour and help the dough to form air bubbles and tenderness.
- Water: I prefer using filtered water at room temperature for best results in my rising of the dough.
- Salt: A little bit of salt goes a long way to help bring out the best flavours. I use any sea salt I have on hand for this recipe.
- Flour: The flour I use is sourced from an organic mill in my area, but any all purpose flour will do!
To make and store this recipe, I use these tools. Click the text to shop:
*Some links are affiliate*
Depending on the time of year you are making this, you may find during the warmer seasons, your bread can over rise or over ferment. This can cause the bread to lose shape and be too sour. If you find your bread doing this, tighten up the stretch and fold time. For example, my stretch and folds happen over about a 12 hour period every 1-2 hours. When a day is warm and that may affect my bread, I reduce my 12 hour schedule to more of an 8-10 hour schedule instead. This will ensure a well fermented bread that still has form and good taste.
How To Make Beginner Sourdough Artisan Round Loaf From Scratch
First, make sure you start the day before you plan on eating this bread. If I want to enjoy this Tuesday, I will begin to make the dough Monday morning. It needs that daytime stretch and folds plus the overnight rest to properly ferment and rise the dough.
The dough is mixed and then stretch and folded by hand, no fancy machines here!

Baker’s Timeline:
This will help you have an idea of what your days can look like as you make your sourdough. It does not have to be a super structured routine, as you can see by the loose use of time below.
STEP 1: FEED YOUR STARTER
The evening before you plan on making this bread, feed your sourdough starter. This will ensure that in the morning next day, it will be active and ready for use.
STEP 2: MAKE THE DOUGH
In a large bowl, combine your starter and water. Stir well. Add in your flour and sprinkle the salt on top. Using your fingers in a swirling motion, combine all the ingredients until the dough is without any dry bits. Let this rest for 30-45 minutes.
STEP 3: FIRST STRETCH AND FOLD
Begin your first stretch and fold. I like the wet my fingers to help the dough stick less to my hands. Take your fingers, tuck them gently under the dough and pull the dough upwards softly. With that length of dough fold it over the dough in the bowl and repeat until you have done a complete circle of stretch and folds.
STEP 4: CONTINUED STRETCH AND FOLD
Place the wet towel over your bowl again and repeat stretch and folds over a 12 hour period, every 1-2 hours. With each stretch and fold, you will notice the dough becoming more elastic, less sticky and easier to wield. As time goes on, the dough will become very round and ball shaped. This is exactly what we want.
STEP 5: SHAPE AND REST
Take your banneton and dust it with a heavy amount of flour. Do one last stretch and fold here to help your dough form into a round lump and not loose.
Taking the rounded, smooth side of your dough, place it into your banneton this side down. Cover with your damp towel OR dust the top with more flour and cover with a dry towel.
Leave in the fridge overnight.
STEP 6: BAKE
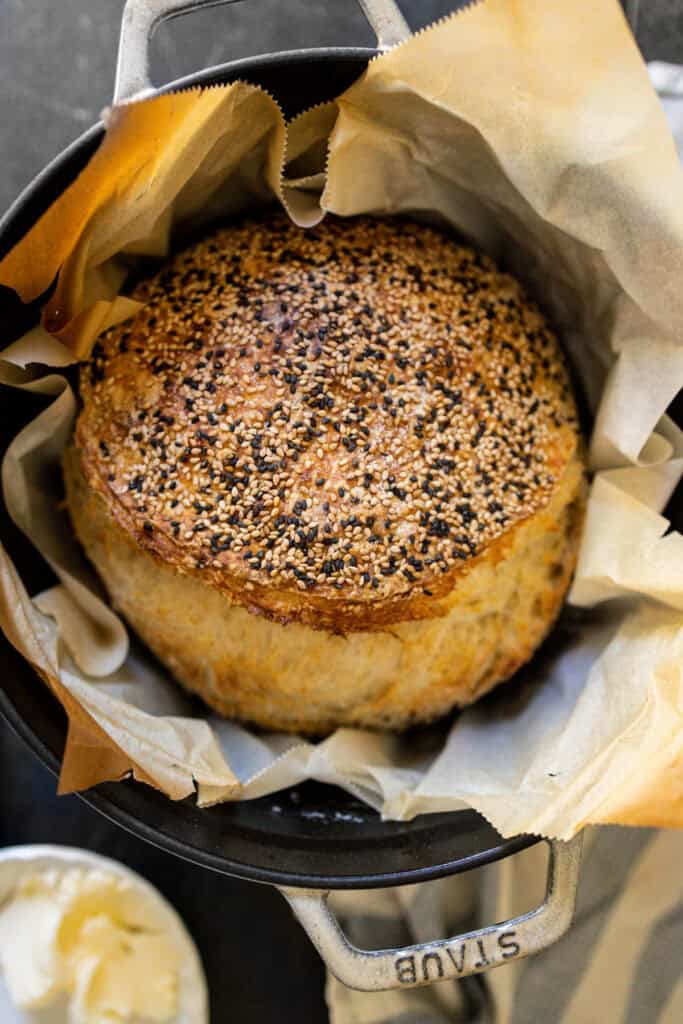
When you are ready to bake your loaf, place your Dutch oven into a 500 degree oven. Let the pot preheat and warm up with the oven.
In the meantime, take a piece of parchment paper and tip your banneton of dough out on it and pull the banneton up and away from the dough. You should have a nice mound to work with. Score (or cut) in the bread a solid 1/2 inch deep cut going from one side of the dough to the other. This will help an ear form in the bread helping it baking and rise well.
When the oven has heated to the 500 degree setting, remove your French or Dutch oven and grabbing hold of the sides of the parchment paper, gently place it in the oven and put the lid on.
Place the sourdough into the oven for 20 minutes. After 20 minutes, remove the sourdough from the oven, take off the lid, and place back into the oven at 450 degrees for 15 minutes or until a rich brown crust has developed. Remove and let cool before slicing.
Stay In The Loop!
Sign up and get my posts sent right to your inbox!
How To Store
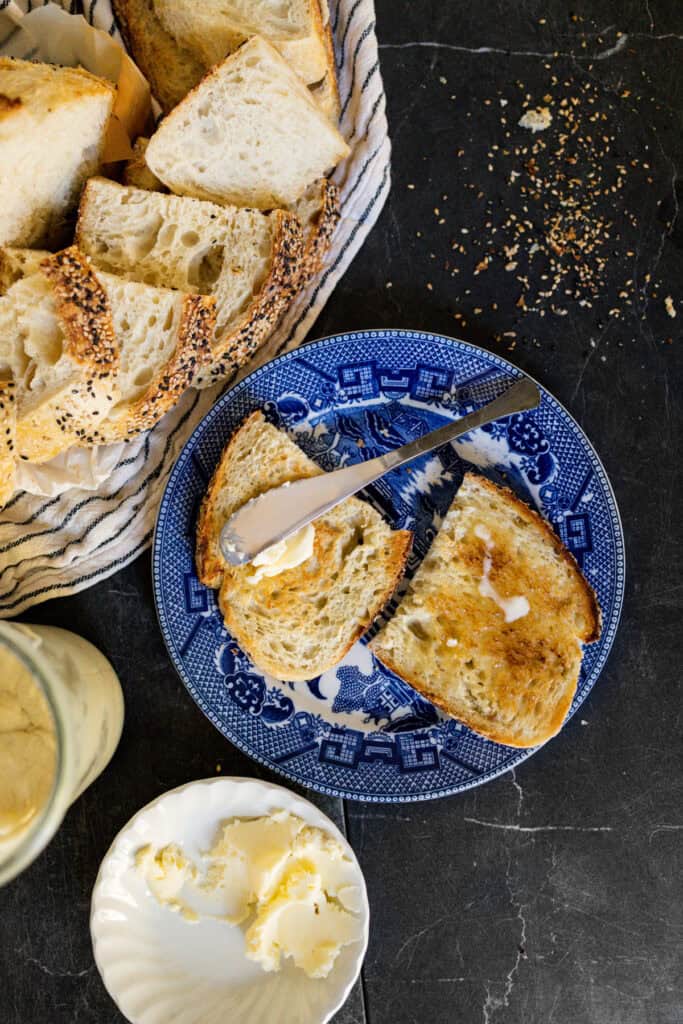
Keep your bread loaf in an airtight container or bread bag at room temperature for 5-7 days or in the refrigerator for 2 weeks.
If you enjoyed this recipe, be sure to share and tag me @sarahthereseco on Instagram and come back here to rate and leave a comment!

Beginner Sourdough Artisan Round Loaf
Equipment
- 1 Banneton
- 1 Dutch or French oven
Ingredients
- 145 Grams Bubbly sourdough starter
- 330 Grams Lukewarm water
- 9 Grams Salt
- 515 Grams Flour
Instructions
- This recipe needs 145g of bubbly starter. I like to feed my starter at 8:00PM so it is at its peak active state by 8:00AM.
- In a large bowl, combine your starter and water. Stir well. Add in your flour and sprinkle the salt on top. Using your fingers in a swirling motion, combine all the ingredients until the dough is without any dry bits. Do not knead the dough, just continue to move and swirl it around until everything is one loose lump. Your dough will feel sticky and rough. This is normal before the gluten starts binding.
- Take a tea towel and get it wet, wring out the excess water and place over your dough. This will help it from creating a hard crust on top in between stretch and folds.
- Between 30-45 minutes, begin your first stretch and fold. I like to wet my fingers to help the dough stick less to my hands. Take your fingers, tuck them gently under the dough and pull the dough upwards softly. With that length of dough fold it over the dough in the bowl and repeat until you have done a complete circle of stretch and folds. It may take about 5-8 turns.
- Place the wet towel over your bowl again to keep your dough moist. For the next 12 hours, ever 1-2 hours complete a set of stretch and folds. With each stretch and fold, you will notice the dough becoming more elastic, less sticky and easier to wield. As time goes on, the dough will become very round and ball shaped. This is exactly what we want.
- At the end of the 12 hours, take your banneton and dust it with a heavy amount of flour. I like using rice flour since it is very light and does not stick to the bread as heavily as bread flour, but either will do. Remember to dust the banneton generously because we DO NOT want our dough to stick to our cloth liner.
- Do one last stretch and fold here to help your dough form into a round lump and not loose.
- This is optional, but feel free to take the smooth side of your dough and roll it in sesame seeds or cornmeal. It creates a beautiful flavour and look.
- Taking the rounded, smooth side of your dough, place it into your banneton this side down. Cover with your damp towel OR dust the top with more flour and cover with a dry towel. Either way works but I have had people tell me sometimes the dough can stick to their wet towel. My towels are very tightly spun linens and denim, so I do not personally experience this.
- Leave in the fridge overnight!
- When you are ready to bake your loaf next day, place your Dutch oven into the oven. Preheat your oven to 500 degrees with the dutch oven inside.
- In the meantime, take a piece of parchment paper and tip your banneton of dough out on it and pull the banneton up and away from the dough. You should have a nice mound to work with. Score (or cut) in the bread a solid 1/2 inch deep cut going from one side of the dough to the other. This will help an ear form in the bread helping it baking and rise well.
- When the oven has heated to the 500 degree setting, remove your Dutch oven and grabbing hold of the sides of the parchment paper, gently place it in the oven and put the lid on.
- Place the sourdough into the oven for 20 minutes. This will create a beautiful foundation for a crisp crust. After 20 minutes, remove the sourdough from the oven, take off the lid, and place back into the oven at 450 degrees for 15 minutes or until a rich brown crust has developed.
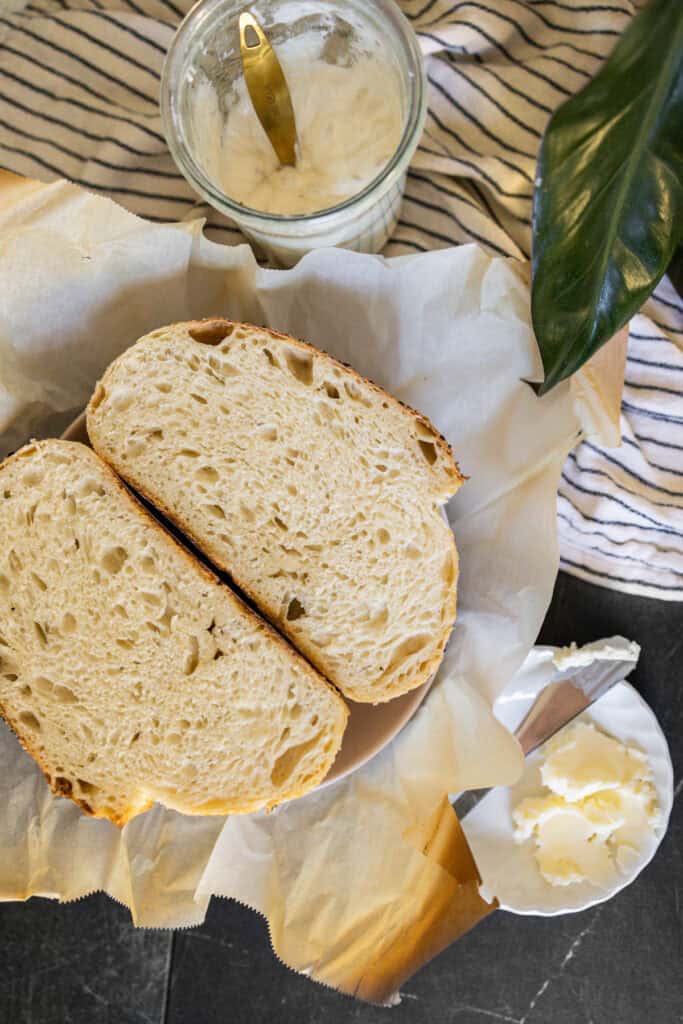
- Wait to cut for at least 30 minutes to ensure a structured crumb.
What kind of flour do you suggest using? So excited to try this!! 🤩
I get an organic flour from our local mill and it is an unbleached all purpose flour. I have had a few of my friends test this out using a variety of other flours (no name, King Arthur, Roger’s, etc) and they all had amazing results. We also love replacing up to 20% of the white flour with a whole wheat flour for a warmer, nutty flavour sometimes! All the best Lily, let me know how it goes!
This was the most thorough and straightforward sourdough recipe I have ever come across. I’ve tried baking a few loaves before but as a beginner I was left confused and with a less than ideal loaf. Sarah’s recipe turned out my best loaf yet and my whole family loved it!! Thank you, Sarah! I cannot wait to make more and dive into your other sourdough recipes. This has reinvigorated my love for making more food from home 🙂
Skye, I am so glad this worked well for you!! So encouraging!
what is the hydration percentage for this loaf? ❤️
65%!
can you put this in a bread machine to do all the stretch and folds for you?
I have not tried that! My bread machine does not do stretch and folds, it only kneads the dough. These are 2 very different techniques! Plus, it needs to be stretch and folded throughout the day, not just for a 1-2 hour period. But hey, never hurts to try!
I’ve tried this recipe in the KBS bread machine on the natural sourdough setting (stopping the machine before it bakes) as well as the leaven dough setting and it’s turned out every time! I will say, doing stretch and folds manually yielded the best final bread texture, but the hands off approach worked nonetheless as long as I followed the rest of the recipe!
I’m not exaggerating when I say this recipe produced the best loaf I’ve ever made (and I’ve tried a bunch of recipes over the past few years, most much more technical than this one). Thank you for sharing!
I’m curious: Have you ever doubled the recipe and split it into two loaves before the overnight rest?
Hi Lindsey! I have done this and it still yields great results!
Hello from the UK! I made my first ever sourdough loaf at the weekend using this recipe. The instructions were so simple to follow and it’s the first recipe I found where I felt I didn’t need a science degree to understand it. The loaf is awesome and I am already planning my next one for the weekend. Thank you for your generosity in sharing this recipe.
Thank you Debbie, I am so glad this was a success for you!
I’ve been making sourdough for years now but my loaves were always hit and miss.
This is the third time I’ve made this recipe and it works every time. I love it!!!
Yay I am thrilled! Thanks Alexandra!
I finally baked the perfect loaf! I have baked a good amount loafs since the beginning of my sourdough journey; using many different recipes, never achieving the golden, crusty perfection. I was so exited when you posted your recipes and can’t wait to bake more!
Sarah!!! I used this recipe for my first loaf EVER and it turned out phenomenal!!! I didn’t have high expectations because I know sourdough can be tricky but you made it so simple with this recipe. I am so grateful thank you for doing what you do!! The way you love your family through cooking is a huge inspiration to me and your website is now equipping me to do the same!!! Thank you, I’m hooked!
Way to go!! I am thrilled!
After reading all these comments I’m inspired to try again. I have tried so many times and it always yield in a wet crumb. I use organic flour too and from other ladies that use regular flour it seems it was potentially the “problem”. I’ve ruled out just about everything else I can think of.
But I’m not willing to compromise on organic with flour so I was to the point of giving up. I’m excited to try again and will come back to say how it went!
Wonderful recipe! It yields a beautiful oven spring!
Wonderful recipe! It yields a beautiful oven spring!!
I started the dough for this last night and at 9:33 this morning it has lost its stretch, is super sticky and seems over fermented. I haven’t experienced this before with making loaves so I’m just very baffled!
From my experience, this recipe does create a sticky dough. Every time I perform a set of stretch & folds, I first wet my fingers.
Have you tried leaving the dough in the fridge for two nights instead of one? Thank you!!
YES, I have left it for 4 days and result was still amazing!
Loved this recipe so much!! The best and so simple! I especially love the flavor development!! Thank you for these wonderful recipes! In the past 24 hours I have made your sandwich bread, this artisan loaf, muffins, and raisin loaf! I am loving learning all these sourdough recipes and sharing them with my sweet family! ❤️
I started this mid morning and folded a few times through the day with no real timeline, then threw it in a loaf dish with parchment before going to bed and turned out awesome!
hey Sarah, i am keen to try this recipe, but i cannot seem to find your recipe for your sourdough starter on your website? please share?
thanks
Got my starter from my local sourdough bakery! Find a sourdough bakery and ask them for some of their starter!
Where can I get sourdough starter? It will be my very first time! I need to help some advice from you.
I got mine from my local bakery and flour mill. They make exclusively sourdough and hand out extra starter!
I got my starter on Tuesday and made my first loaf today using this recipe, and Sarah when I say I was SHOCKED, I was shocked at how good it turned out!! With absolutely no previous experience with sourdough I can definitely say this recipe is AMAZING for beginners!! Your instructions are so clear and easy to follow. I know for sure I will come back to this recipe many more times! If I could attach a picture I would, just to show you how absolutely proud I am of it. 😉 Thank you Sarah!!
This is honestly the best “Traditional” sourdough loaf I have tried. I have been baking with sourdough for a few years now and have tried multiple recipes. I enjoy the round boule bread but my kids had a hard time chewing it due to the hard crust. This recipe creates a beautiful boule that is soft and chewy. We have been baking this bread for a few months now and I can say it has become our favorite!
I usually double the recipe to make two boules and then we gift the other to friends/family.
Thank you dear Sarah, it turned out perfectly!
Will using bread flour (hard red wheat) work? I noticed that you say you used an all purpose, curious what wheats make up your flour? Thanks 🙂
So so so pleased 🥰 Have never really enjoyed baking, but since having been well inspired by you Sarah, I have now tried many of your recipes with great results. Yesterday, I succeeded with this mammoth baking-task (believe me, I REALLY have disliked baking and avoided it more than anything else!). The bread was SOOO GOOD!!!! And the process actually enjoyable ☺️
Thank you for having changed my life Sarah Therese, we now eat gut-healthy bread and sweets every day!
Most recipes do stretch and folds every 30 min over 2-4 hrs, and I’ve tried this recipe and comes out great but I feel like I second guess how many stretch and folds are needed over that long of time. Is there a reason to why so many over the longer time intervals? I’m so curious and trying to improve my bread making skills. Love all your recipes so far! I make your sandwich bread weekly.
Hi Sarah!
Im so excited to try this recipe. I am new to sourdough. Do you think a banner ton is necessary? Could I use any bowl like w wife round gosss Pyrex bowl or Corelle? Curious if that matters. Thanks!
Hi! A banneton works to let air into the bread to further fermentation. A bowl may stop that. If that is all you have, try it out and see BUT you can also use a colander, sieve or extra basket!
My very first sourdough loaf ever turned out beautifully! Your recipe is so easy to follow! Thank you! Have you ever made an Asiago cheese sourdough loaf?